My garage door is dumb and I searched for a way to make it a bit more intelligent, one way is to buy the HomeLink Module for your Tesla. But still, you have to interact with it to open or close the door and its not cheap. I already have a running IOBroker installation for different home automation things, TeslaMate and a big Zigbee installation at home, so i have a good base to start here.
Attention: You have to be familiar with Tasmota, MQTT, IOBroker (or similar), Zigbee (or similar), basic wiring and soldering! This is definitely nerd stuff and not for the average Tesla driver out there, you’ll need some kind of insanity to complete this tutorial 😉
The idea is, we’re using the SR04 Ultrasonic Sensor to measure the different distance from the ceiling with the car parked in the garage and not. Every Tesla sends out a unique iBeacon to search for the mobile phone and the Tesla App, we’re gonna use that iBeacon to identify our Tesla. So we can use both sensors to be quite sure if the Tesla is in the garage or not. For safety, the Infrared Sensor Barrier should be installed to let the door only roll down if there is nothing in between. Teslamate can create Geofences, so we bring all of this features together to magically open and close the door completely autonomous!
Requirement for the garage door: You’ll need two pins on your garage controller free to wire the relay, those two pins needs to be connected for a short time, similar to a key switch! Or use the two pins used for that key lock. You’ll also need some hardware to detect the two states of the garage door, open and closed. In my case, I used two Zigbee Aqara Window / Door sensors, one for open, one for close! So whatever you’ll gonna use, it must report it states to the IOBroker or similar installation ether via MQTT or native (Zigbee in my case).
Hardware you’ll need:
- ESP32 TTYGO T7
- 1 Channel High Trigger Relay
- SR04 Ultrasonic Distance Sensor
- Infrared Sensor Barrier
- 12v to 5v StepDown Module
- WS2812 NeoPixel Ring (Optional)
- Aqara Zigbee Door / Window Sensor (Optional, but you need something like this!)
- 2.4GHZ Wifi Antenna (Optional)
- 12v power supply (Do not use cheap ones and not less then 1.5A!)
Software you’ll need:
- Tasmota Bluetooth Build with SR04 Option.
- IOBroker or similar (OpenHAB e.g.)
- Teslamate
- 3D Printed Cases for PCB with Relay and PowerSupply.
Flashing Tasmota:
Now it’s time to install Tasmota on the ESP32. The thing here is, the current bluetooth version does not have a SR04 option compiled. So you have to compile it yourself or use my build, if you want to use my build, use the esptool to flash it, otherwise VisualCode with PlatformIO will do the job. Connect your ESP32 to whatever you have, linux, MacOS or (really?) Windows.
First erase flash of your ESP32:
esptool.py --port <YourPort> erase_flash
Now flash my build with esptool:
esptool.py --chip esp32 --port <YourPort> --baud 921600 --before default_reset --after hard_reset write_flash -z --flash_mode dout --flash_freq 40m --flash_size detect 0x1000 bootloader_dout_40m.bin 0x8000 partitions.bin 0xe000 boot_app0.bin 0x10000 tasmota32.bin
Now you have to configure the fresh Tasmota installation. Do the basic stuff like, Hostname, MQTT Settings, Device Name, Friendly Name and so on. Do not forget to enable Bluetooth!
Wiring everything together:
For wiring I suggest the follow GPIO usage:

You need a level shifter between GPIO16 and your SR04 PIN because it will output 5v, the ESP32 GPIO are not 5v tolerant! I used a simple AMS117-3.3v to shift it down from 5V to 3.3.
The InfraredSensor Barrier is powered by 12v but has a relay build in which we use to set 3.3v to GPIO5 and use it as a switch. So the “Switch_d” here is simply a wire from 3.3v to the Infrared Sensor Barrier relay, so the barrier switches a relay on and off, we’re gonna use that to see if there is nothing in between the garage door. The Infrared Sensor Barrier itself needs 12v, that’s the reason why you will need the 12v to 5v step down converter! I used a 4 wire cable for the receiver and a 2 wire cable for the sender part.
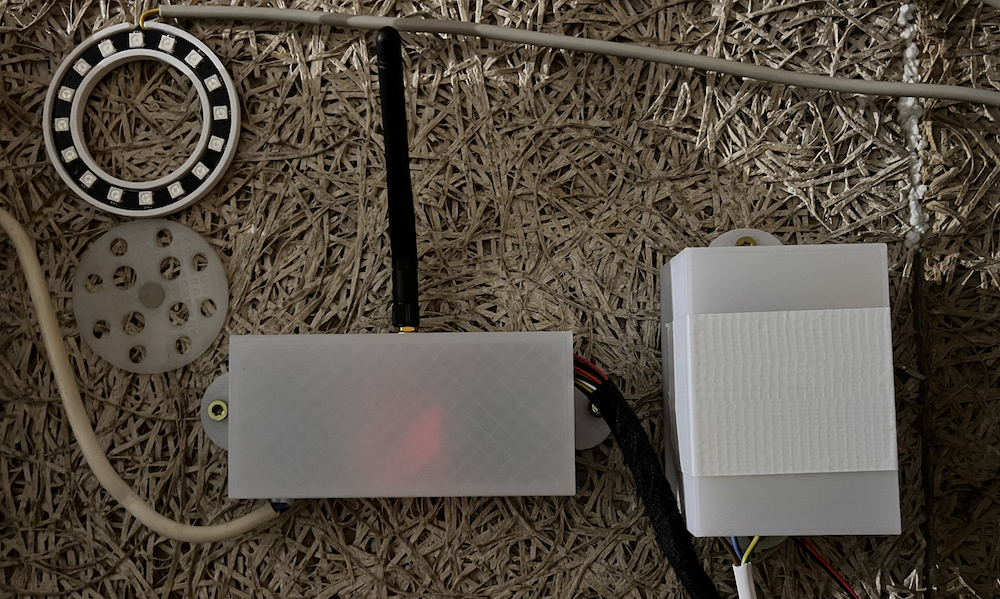
Now place your SR04 on the ceiling above the Tesla and wire it with a 4 wire cable. I made a 3D printable case for it, which is in the same zip file as the other cases.
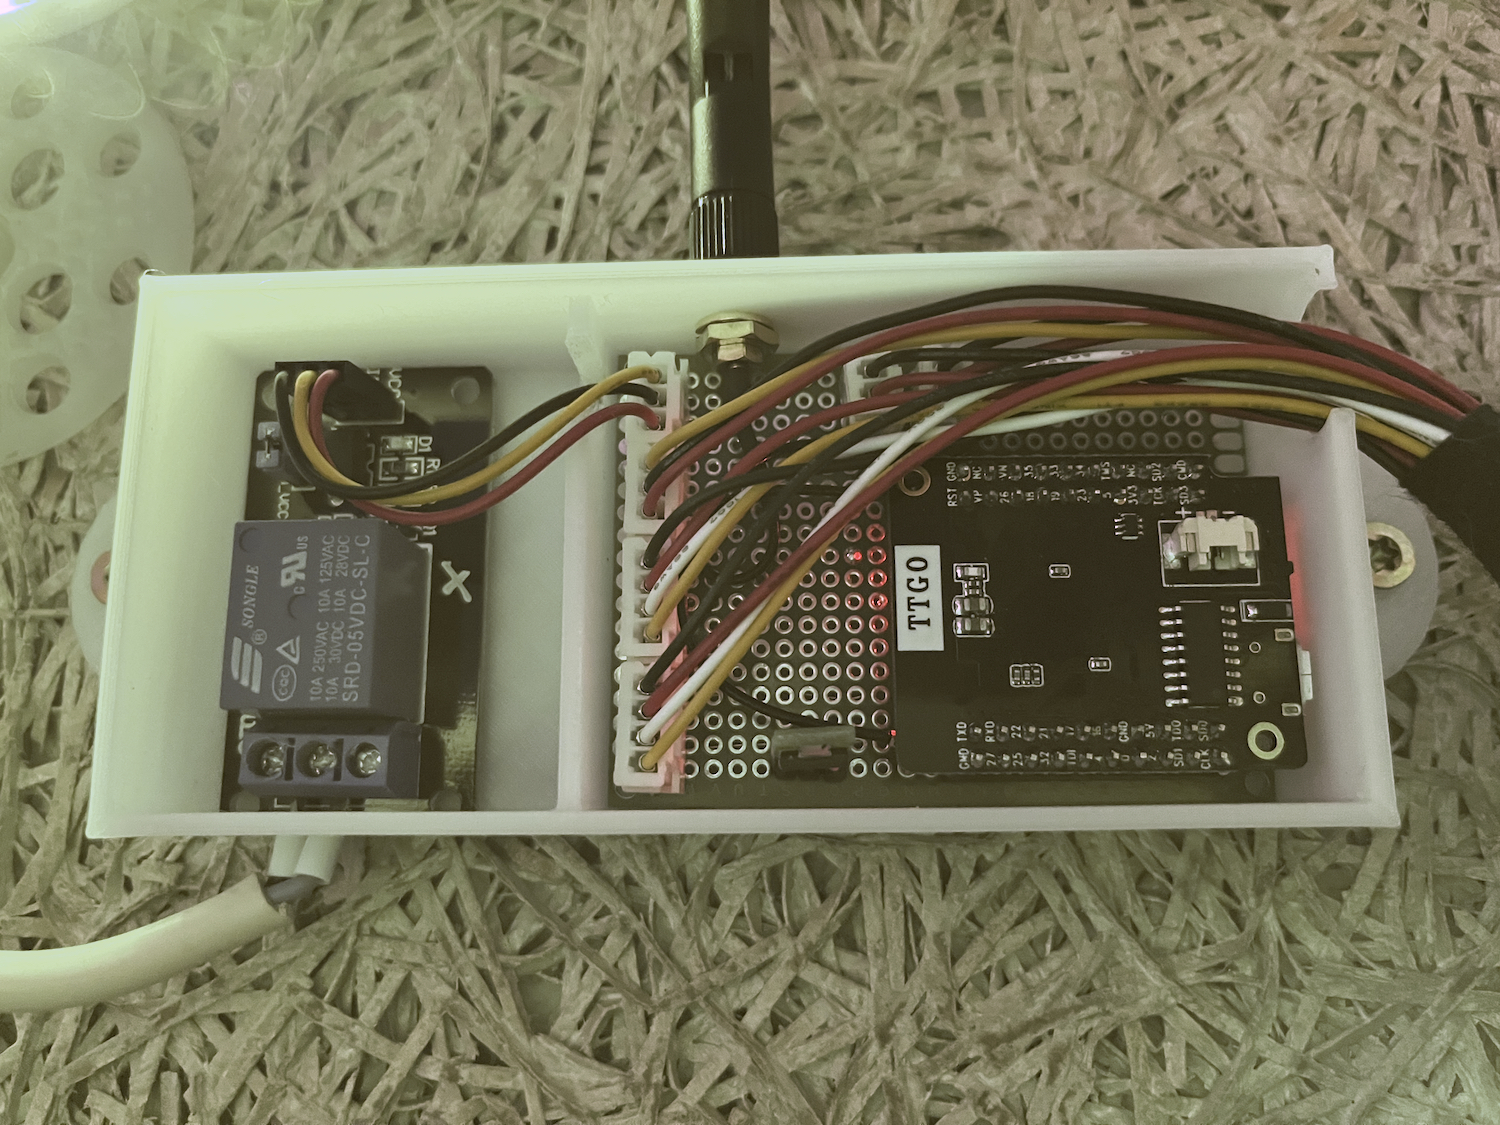
I used a 70×50 PCB and copper magnet wire to wire everything together. The 12v to 5v step down converter is also mounted on the board under the ESP32.
Power the ESP32 up, open the Tasmota Console and type in the following code:
switchmode1 1
SetOption114 1
rule1 ON System#Boot DO iBeacon 1 endon
rule1 1
rule 2 ON System#Boot DO Backlog iBeaconPeriod 10; iBeaconOnlyAliased 1; BLEMaxAge 20; BLEAlias <YourBLEAdressOfYourTesla>=Tesla endon
rule 2 1
rule3 ON Switch1#state=1 DO Color #66ff35 ENDON ON Switch1#state=0 DO backlog power2 on; Color #C70039 ENDON
rule3 1
pulsetime1 5teleperiod 10
So what we do here in detail:
- Changing the SwitchMode to 1
- Detaching switches from relays (Important!)
- Enabling ibeacon at boot
- Setting iBeacon publishing to 10 seconds, only allow aliased iBeacons, set the BLEMaxAge timeout to 20 seconds. Most important you have to find out your BLE Adress of your Tesla and paste it there.
- Rule3 is optional, it will interact with the WS2812 and show you a green light if the way is free and a red light if there is something blocking the garage door.
- The garage controller needs only a short impulse on the controls PINs to open the door, so we set it to 0.5 seconds here.
Blocky Logic, or the autonomous part:
Now we come to the part where all of this comes together and we need some logic here. The reason why im using Blocky is simple, I don’t have deep knowledge of JavaScript 🙁 But in my case, blocky works fine.
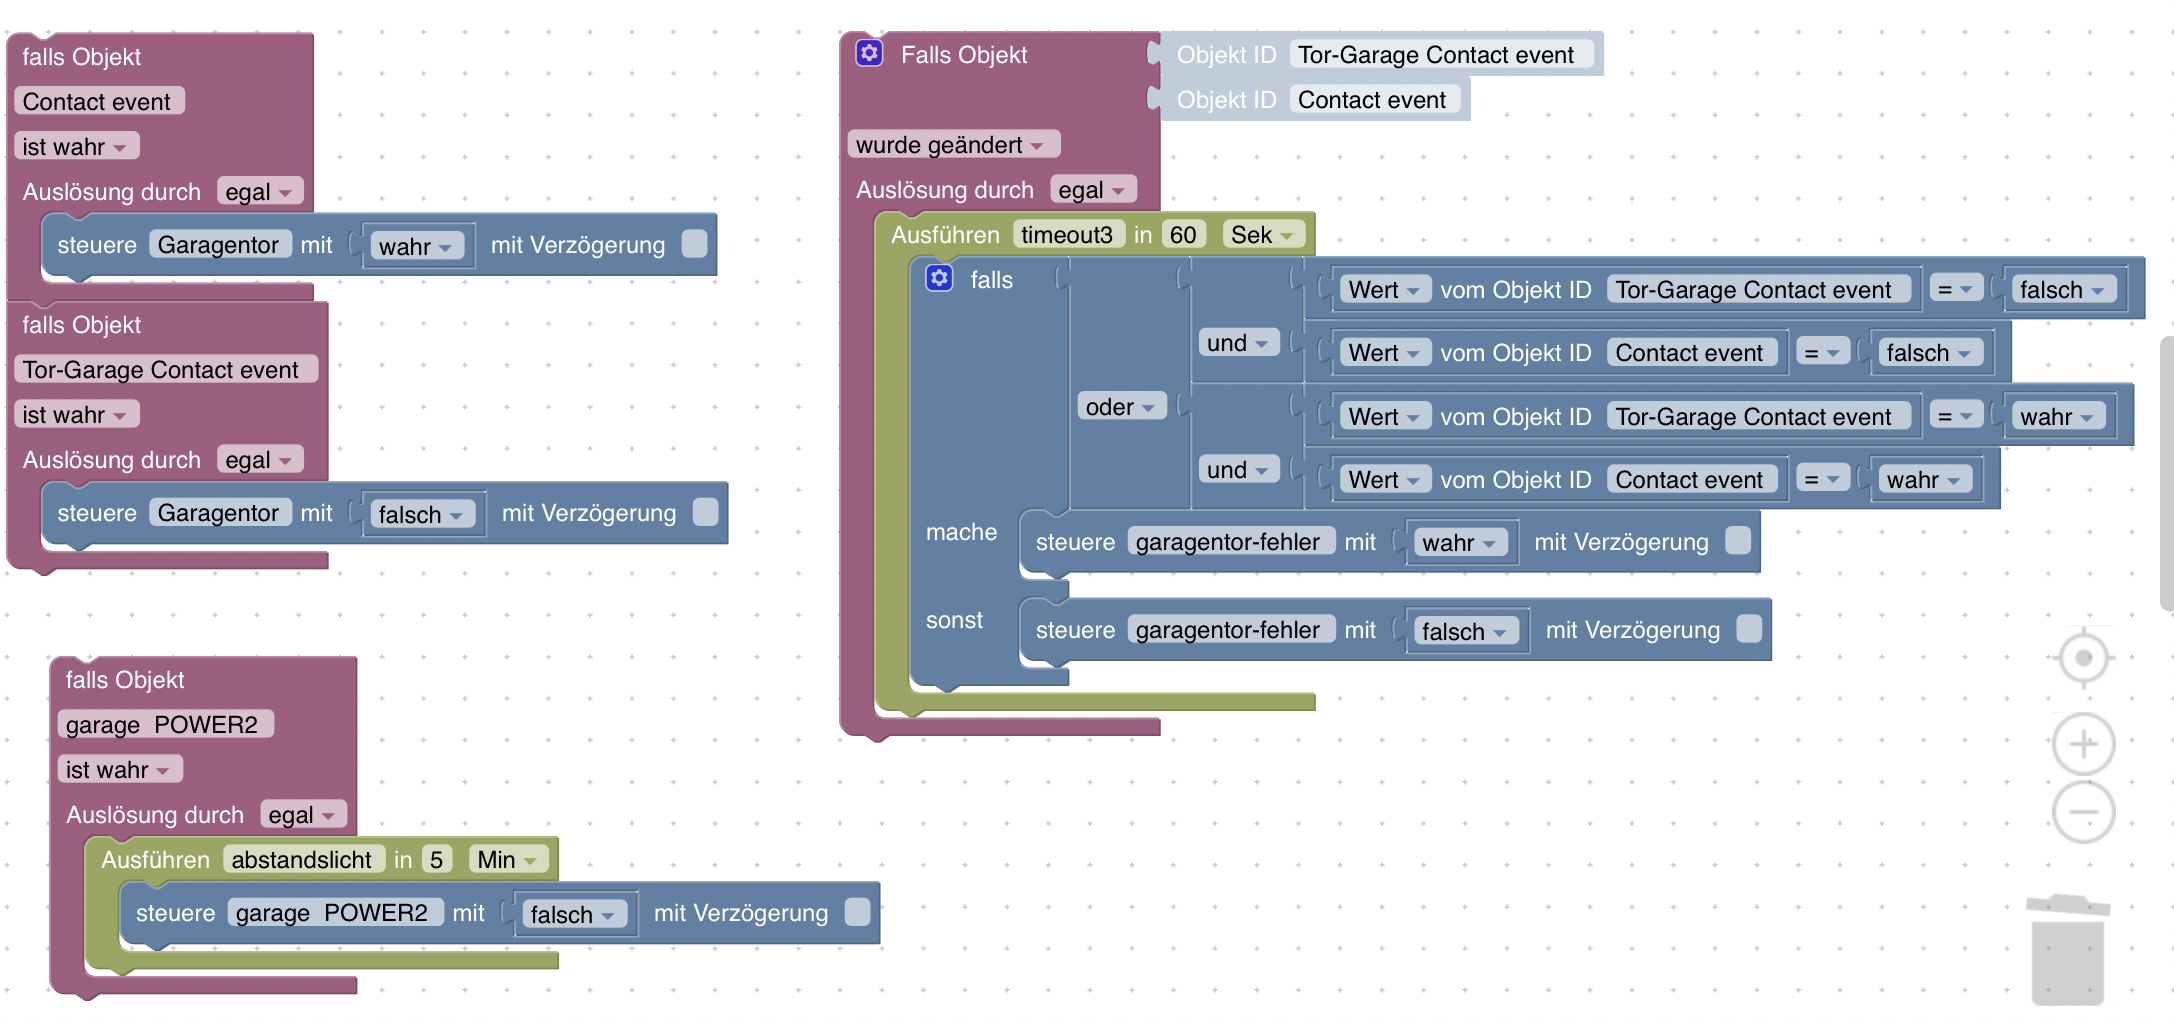
You have to create two boolean objects here, “Garagentor” and “Garagentor-fehler”. What we’re doing here is simple, the first checks for contact events of the Aqara Door Sensors and set the Garage Door status. The second one is to do more error handling of the door itself. It checks if booth of the Aqara sensor in the same state for more then 60 seconds, this can be the case if the door is only half opened or one of the sensors are not responding. Later we’ll use this to decided if we can interact with the door or not. The third option is to switch off the WS2812 after 5 minutes. Because rule3 on Tasmota enables it.
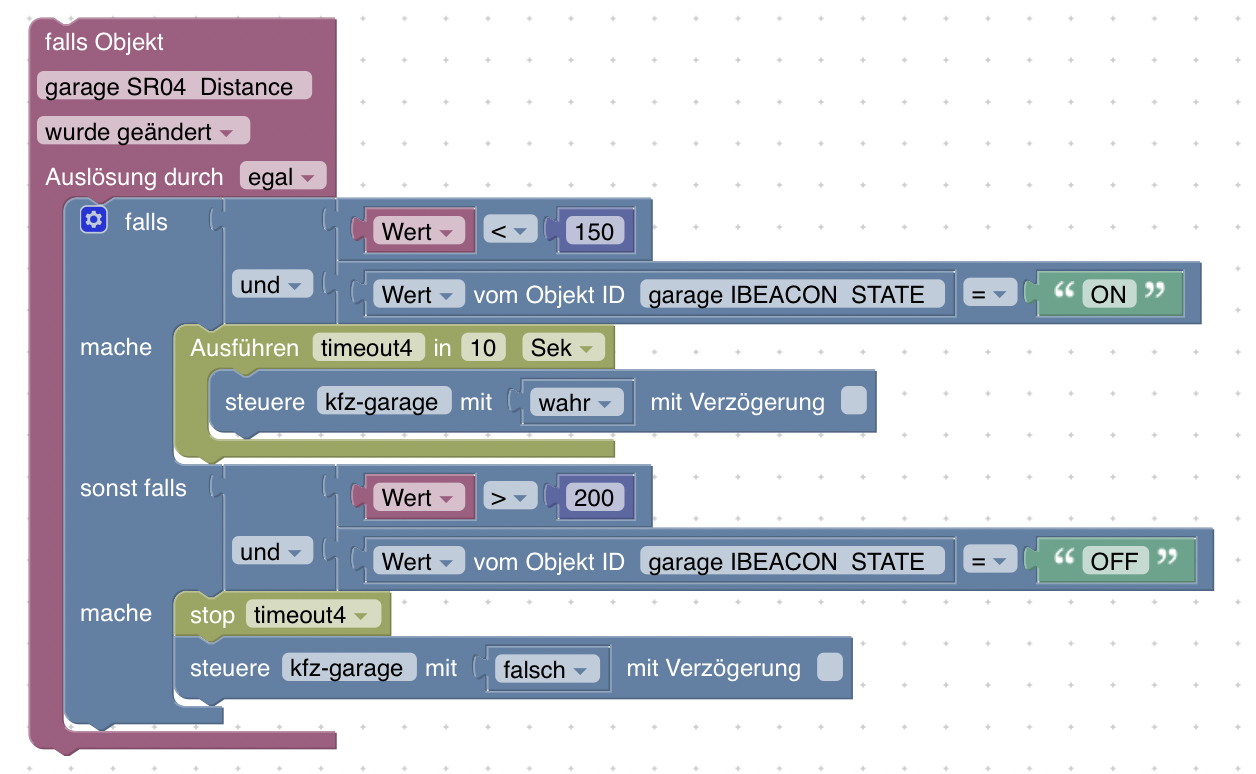
Now we’re coming to the part to detect if the Tesla is in the garage or not. You need to create a boolean object “kfz-garage”. I’m doing this here by checking the SR04 element changed, it would change every 10 seconds because of the telemetry settings of Tasmota. You have to adjust the distance settings here to fit your garage! For me the distance between the ceiling and the Tesla is around 130cm, so 150cm here should be ok. I’m also using the iBeacon state here to be sure its my Tesla who is sitting in the garage or is nearby. Time to wait is 10 seconds. If the Tesla is not in the garage or nearby, the distance is more then 200cm and of course there is no iBeacon from it -> Tesla is gone.
Open and Close “Logic”
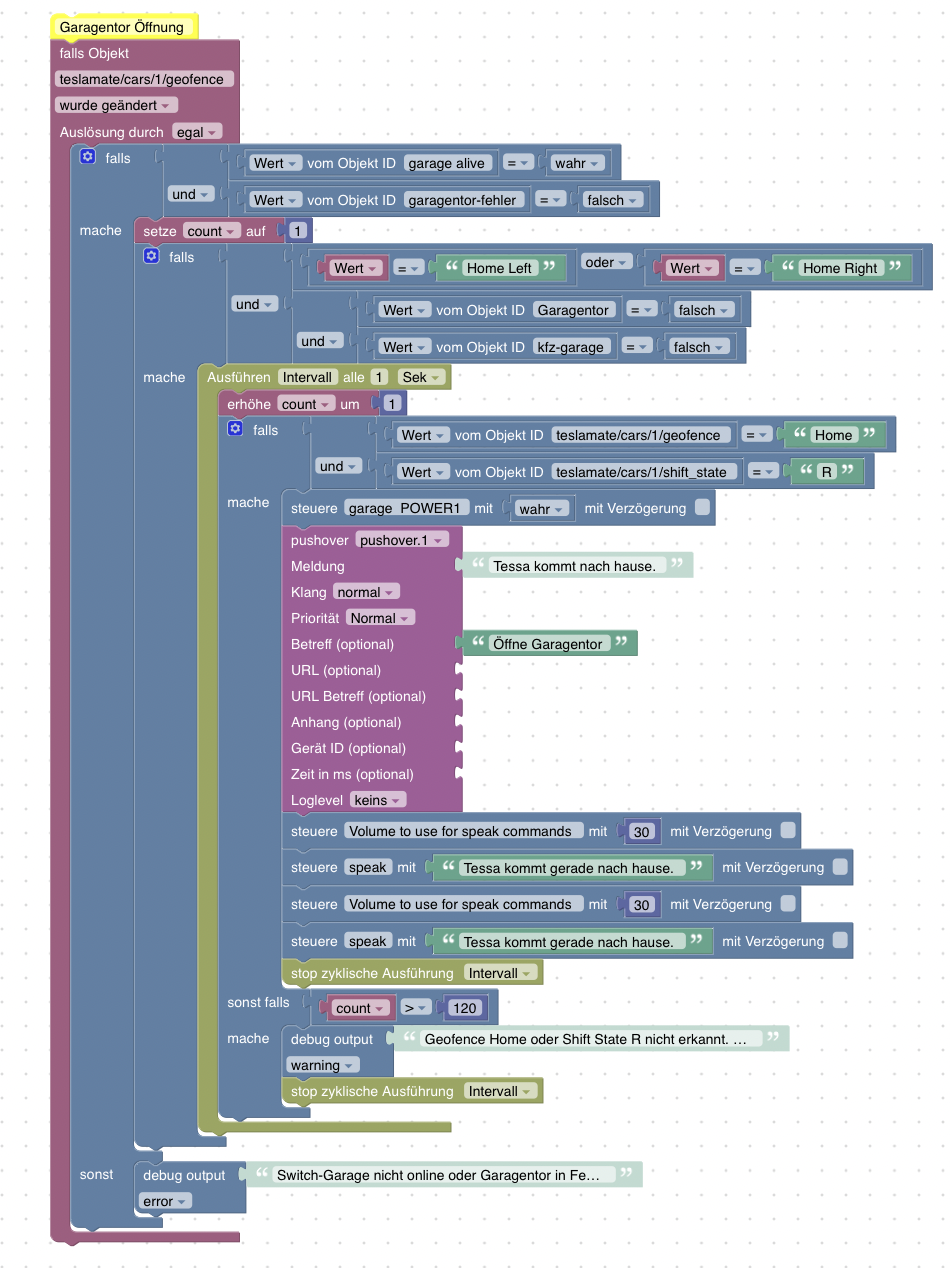
Now open your Teslamate installation and head over to Geofences, this part can be be tricky for your location, I only have one street where my Tesla came from left or right, so I created two enough big Geofences to detect my Tesla. So you can see here “Home-Left” and “Home-Right”, if Tesla passes one of these Geofences the interval starts. So you need a distance between “Home-Left” or “Home-Right” and your “Home” geofence! It waits 120 seconds to detect the last geofence “Home” and a shift state of “R”, because we’re always parking backwards in our garage. Then it will send a “true” to the Tasmota power1 and the door opens. As you can see here, it will also send out a Pushover and let some Amazon Echos say that Tesla comes home 😉 – This is the part you have to tweak most. It will heavily depend on your location.
For closing the garage door we need some more logic or some more safety checks. First we check if the car is still in the garage or near the garage (Remember the Blockly for it? The boolean “kfz-garage” only changes if both, the SR04 and the iBeacon changes.), so you can park in front of the garage door to move out your shopping bags, dogs, wife or whatever you have in your Tesla. If “kfz-garage” changes to false we’re doing some basic safety checks and other things, if the garage door is open, no Tesla in the garage or nearby, is the Teslamate state “driving”, the geofence not “Home” and most important, the Infrared Sensor Barrier free. Then the blockly will send true to the Tasmota power1 and closes the garage door. I let the debug stuff here, to see what is blocking it from closing. You also should leave debug enabled for some time. It also sends out a Pushover when the door is closing.

I searched for a way to let the Tesla notify me somehow that the door is closed. Unfortunately the only way I know is to send out a SMS to the actual connected bluetooth smartphone… I think this idea would work but is somehow ugly… I mean sms in 2022… and we need a different logic to check which phone is connected and so on. So it is pushover for now.
So that’s it for now. If you have questions, leave a comment and I’ll try to answer as soon as possible.

0 Comments.